当前位置: 首页 > 网络学院 > 设计教程 > 设计理念 > 图形简介:第三部分
 设计理念 中的 图形简介:第三部分
出处:互联网 整理: 软晨网(RuanChen.com) 发布: 2009-03-01 浏览: 2489 ::

收藏到网摘: n/a


Image Maps
图像映射
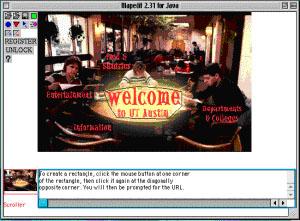
Image maps let you specify different hot spots on a single image. For example, the image below has five hot spots linking to five different URLs.
图像映射可以使你在一张单独的图像上指定热点区域。举个例子来说,下面这张图包含有不个不同热点的URL。

Many Web publishing programs like Microsoft FrontPage and Macromedia DreamWeaver support image map creation. Adobe Photoshop can also be used to create image maps. In addition, there are numerous shareware programs available. This tutorial outlines the process for creating image maps with the shareware program called MapEdit and with Microsoft FrontPage.
很多网站发布程序,诸如微软的FrontPage以及Macromedia 的DreamWeaver都支持图像映射的创建。Adobe Photoshop 也同样可以被用来创建图像映射。另外,另外,还有很多可以使用的共享软件程序来创建图像映射。这份教程将大致地教你如何使用MapEdit 和 微软 的 FrontPage 的相关程序来创建图像映射。
The instructions below describe client-side image maps. Client-side image maps store link and coordinate information in the HTML page itself rather than in a separate file on the server. Client-side image maps are supported by Netscape Navigator 2.0 and later, NCSA Mosaic 2.1 and 3.0, and all versions of Microsoft Internet Explorer.
下面这份教程大致描述了客户端图像映射。客户端图像映射储存了HTML页面中的链接和坐标信息,而不是位于服务器上的一个单独的文件。客户端图像映射被Netscape Navigator 2.0以上的版本、NCSA Mosaic 2.1和3.0以及所有微软的IE浏览器支持。
Creating Client-side Image Maps with MapEdit
使用MapEdit来创建客户端图像映射
1. Download MapEdit from boutell.com
从boutell.com下载MapEdit。
2. Install the software on your computer. The Macintosh version of MapEdit requires Macintosh Runtime Java.
在你的计算机中安装软件。在苹果机中安装MapEdit需要安装Macintosh Runtime Java。
3. Create an HTML page with one or more inline images specified with the <IMG> tag.
通过<IMG>标签指定的一张或多张内嵌图像来创建一个HTML页面。
4. Open the HTML document in MapEdit.
在MapEdit中打开HTML文档。
5. MapEdit displays a list of the images in the HTML document. Select the one for which you want to create an image map.
MapEdit显示了HTML文档中的图像列表。选择一张你喜欢的图像来创建图像映射。
6. Choose the Rectangle, Oval, or Polygon tool and draw a hotspot on the image.
选择矩形、椭圆形或多边性工具在图片上拖出一个热点范围。
o To create a rectangle, select the Rectangle tool, click the mouse where you want the upper left corner of the rectangle to be, then click the mouse where you want the lower right corner to be.
选择矩形工具创建一个矩形、鼠标点击举行的左上方,一直向右下方拖动,直到出现你期望的矩形形状。
o To create circles, select the Circle tool, click where you want the center of the circle, and then click the outside edge of the circle.
选择圆形工具创建圆形区域,先点击圆心位置,然后再点击圆形的外圆弧。
o To create a polygon, select the Polygon tool and click the mouse where you want each point of the polygon. (If you're using a Macintosh computer, close the polygon by double-clicking on the last point. PC users, right-mouse-click on the last point to close the polygon.)
选择多边形创建一个多边形,用鼠标分别点击多边形的每个连接点。(如果使用的是苹果电脑,在最后一个多边形连接点处双击鼠标关闭多边形。如果PC机,则单击鼠标右键关闭多边形。)
如果你在使用工具的过程中出现失误,那么你可以很容易地删除已画出的区域并作再次尝试。
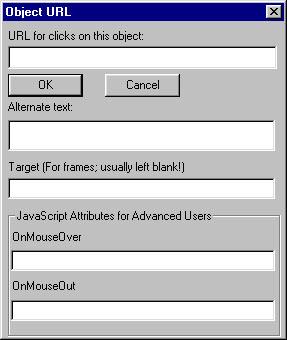
When you have completed drawing the hotspots, MapEdit displays a dialog box where you can enter a URL for the hotspot.
当你画完了整个区域后,MapEdit将会在你绘制的区域中显示出一个对话框,你可以在该对话框中输入URL。
1. When you have created all desired hotspots, choose File , Save HTML Document and Mapedit saves the HTML file. Note, Mapedit has not changed the graphic file.
当你已经创建了所有的区域后,选择文件,保存HTML文档,此时,MapEdit将会保存这个HTML文件。注意:MapEdit还没有改变这个图形文件。
2. Test the image map in a Web browser.
在网络浏览器中测试这个图像映射。
MapEdit inserts client-side image map code into the HTML document.
MapEdit将把客户端图像映射代码插入HTML文档中。
| <img src="studying.gif" usemap="#studying" border="0"> <map name="studying"> <area shape="rect" alt="The University of Texas" <area shape="circle" alt="Yahoo" <area shape="default" nohref> |
The <AREA> tag indicates the shape of the hotspot, the coordinates, and the URL. For example, the first <AREA> tag within the map is a circle with center at 65,154 and a radius of 25. This hot spot points to www.apple.com. The next <AREA> is a rectangle whose upper left corner is 110,29 and whose lower right corner is 229,102. This hot spot links to www.utexas.edu. The USEMAP attribute of the <IMG> tag tells the browser which map to use.
<AREA>标签显示了指定区域的具体形状、坐标和URL。举个例子来说,第一个映射中的<AREA>标签指定了一个圆心坐标为(65,154)半径为25的圆形。这个区域内的热点链接指向www.apple.com;接下来的<AREA>标签指定了一个矩形,它的左上角坐标为(110,29),右下角坐标为(229,102)。这个区域内的热点链接指向www.utexas.edu。<IMG>标签的USEMAP属性将告诉浏览器该使用哪个具体的映射。
Creating Image Maps with Microsoft FrontPage
使用微软的FrontPage来创建图像映射
1. In the FrontPage Editor, choose Insert , Image to place an image in a Web page.
在FrontPage编辑器中,选择插入,图像将一张图像放置在网页中。
2. Click once on the image to select it.
鼠标单击图像选中该图像。
当图像选中后,FrontPage的图像工具条将会出现在显示器的底部。图像工具条拥有创建热点区域以及选择透明色的工具(见下图)。

1. Select the appropriate tool and draw a hotspot. When you release the mouse, FrontPage displays the Create Hyperlink dialog box where you can type the URL for the hotspot.
选择适当的工具绘制一个热点区域。当你释放鼠标时,FrontPage显示创建超链接的对话框,你可以在其中输入该热点区域所对应的URL。
当所有的热点区域被创建以后,选择保存文件来保存文档。如果你改变了图像的透明度,FrontPage同样会询问你是否需要保存改变后的图像。
 评论 (0) All
